My Etsy shop

Tuesday 23 August 2016

From buying the wood to finished item

From buying the wood to finished item

I thought you might like to see part of the process that I used recently to make some buckeye burr hybrid blanks and a finished box with one of them.

First off allot of people don't realise how hard it is to buy buckeye burr in the u.k and how few American sellers are willing to sell it!

I found this piece of blonde buckeye burr on the US version of eBay and he was willing to ship outside the US

how the wood looked when it was delivered


the wood was covered in a type of wax but luckily it was slightly oversized at 70mm so I was able to cut a thin strip of each edge on the bandsaw removing the wax from the outside surfaces.

I cut it into 3 blanks and used a burr in a dremel type tool to clean out the bark inclusion cavity's

after cutting to size and cleaning


The wood was then stabilised under vacuum in cactus juice resin to harden it
being stabilised in the vacuum chamber

once cured I cleaned out any excess stabilising resin from the cavity's and could cast it with coloured resin to form solid blanks.

I chose one in green, one in blue and one in a smoky grey/black

the 3 blanks after casting


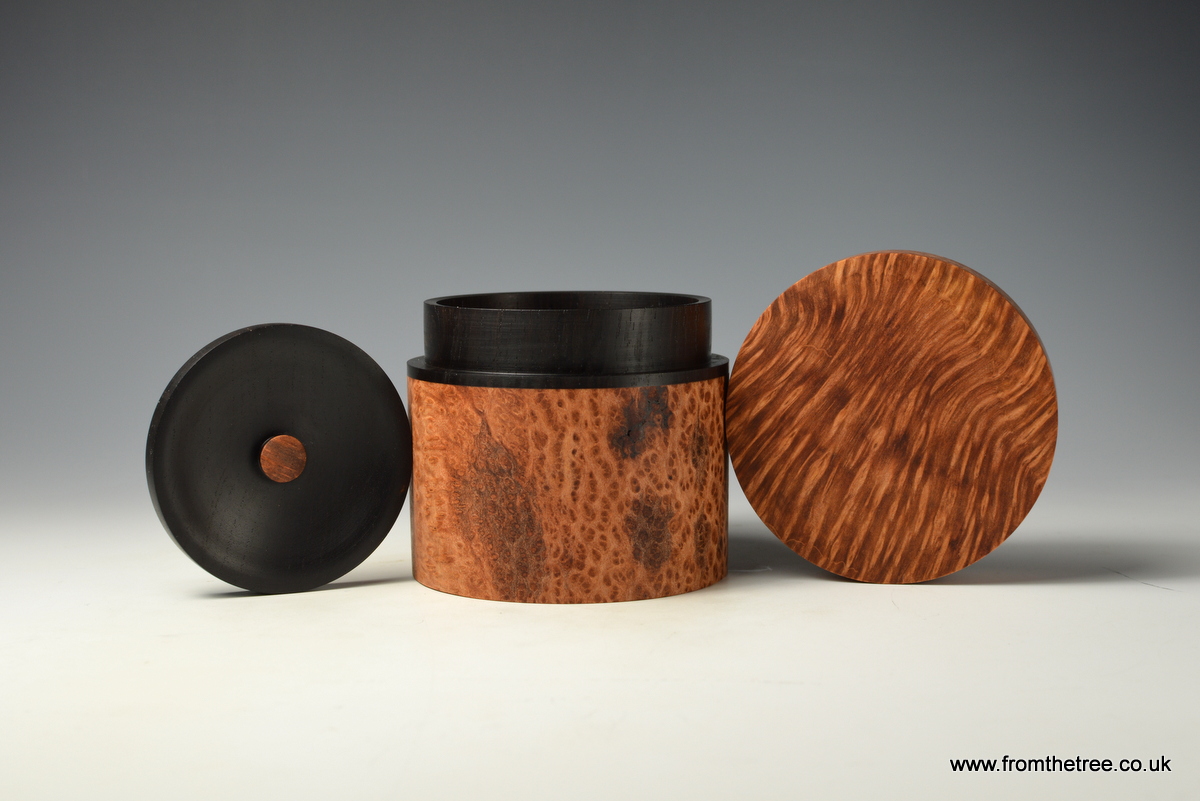
I have sold the green blank on my website and have turned the black blank into a box, I am still unsure as to what to do with the blue blank.

the finished black resin box


Thursday 18 August 2016

Redwood burr box

Redwood burr box

Following on from my previous post where I was writing about my new vacuum chamber and stabilising some redwood burr.

Here is the finished box that I made with that stabilised wood.

Redwood burr & African blackwood box

Redwood burr & African blackwood box

Redwood burr & African blackwood box

Redwood burr & African blackwood box

Tuesday 9 August 2016

Vacuum chamber & stabilised redwood burr

Vacuum chamber & stabilised redwood burr 


I have been using a homemade steel vacuum chamber to stabilise soft and punky woods for a couple of years now

Metal vacuum chamber

Although it works OK trying to see what is happening by looking down onto the surface of the resin is difficult.

I buy and use Cactus juice stabilising resin from Turntex woodworks in Texas, USA and decided to take the plunge and buy a chamber too.

Chamber from Turntex woodworks.
I had some really highly figured redwood burr that I wanted to use to make turned boxes with but I knew from past experience that the burr is too soft to cut cleanly without stabilising.

highly figured redwood burr
The burr was covered in wax and wet when I bought it so I roughed out one piece in April 2016 and set about slowly drying it as to stabilise wood the wood must be bone dry


I had the burr ready by late July so I put it and a few other pieces into the chamber

First batch in the new chamber before adding resin

I had a new batch of cactus juice so I added 3/4 of a US gallon into the chamber. 

Initial forming of air bubbles


When you first pull vacuum you the air bubbles coming from the wood can be extreme and can rise up the chamber towards the lid and can enter the tube leading to your pump if your not careful!! so you have to control this with a bleed valve and then after a the first few minutes you can shut the valve and be at full vacuum.


the advantage of the clear chamber is being able to control & monitor the process


  You can see the air being pulled from the redwood burr blank


 After 3 hours of vacuum being pulled the air bubbles stopped, (the time under vacuum varies) 
If there is any moisture in the wood you will get small champagne type bubbles and they will take hours and hours to stop so it is really important that the wood is bone dry
I put a piece of masking tape onto the resin level before releasing vacuum.

The resin needs to be at least an inch above the surface of the wood before you release vacuum if the wood becomes uncovered in the initial release of vacuum it draws air back into it and you have to start all over again.

26mm change 
One minute after releasing vacuum the resin had dropped by 26mm

Normally you leave the wood in soak overnight then cure it the next day but i was advised that redwood benefits from a longer soak so I left everything in the chamber for 1 week

31mm change

After 3 days the resin level stopped dropping and stayed 31mm away from where it started.

here you can see some before and after pictures showing the weight increase and the figure in the redwood burr blank once it had been cleaned up.
redwood burr before stabilising

walnut before stabilising

redwood burr after stabilising

walnut after stabilising


Thursday 4 August 2016

Eccentric woodturning chuck

Eccentric woodturning chuck


I have been interested in eccentric turning for quite some time now but have never took the plunge. That changed recently when a friend of mine Richard Findley posted a picture on his instagram of an eccentric pattern that he had made using the axminister eccentric spiralling chuck.

So here is my first few goes with the chuck and initial thoughts.

The instructions provided with the chuck are useless but thankfully there is a YouTube video showing its basic principle so that was where I started.

after watching the video I thought that it was going to be tiresome to keep removing the chuck and undoing the allen key, but it wasn't that bad with each one of the following examples taking about 10 minutes to complete. 

After screwing on a scrap piece of wood my first try was with an offcut of black and white ebony which was glued to the scrap.


1st try

1st try

my next try was a little different as I put a smaller deeper pattern in the middle then a shallower pattern around the outside

after the first stage

completed 
next I tried a piece of olivewood
olivewood
I have enjoyed using the chuck and think that i will use it on the top of turned boxes.